上个月我收到了微芯(Microchip)的PolarFire SoC FPGA Icicle 开发套件,该套件的一大特点是 PolarFire SoC FPGA 具有 5 核 64 位 RISC-V CPU 子系统和一个 254K LE 的 FPGA,并被加载到了基于 OpenEmbedded 的预装 Linux 操作系统中。
本文我将展示如何快速使用 Yocto BSP 并运行 EEMBC CoreMark 基准测试,并且我还会在几周内评测这块带有Libero SoC 设计套件的FPGA。
PolarFire SoC FPGA支持的操作系统
我最初的想法是将这部分评测集中在 Linux 的 RISC-V 状态、检查一些系统信息、运行一些基准测试(例如 SBC-Bench)、编译 Linux 内核以及安装诸如 LEMP 堆栈(如:Linux、Nginx(发音为 Engine-X)、MySQL、PHP)之类可以用于WordPress 托管的服务。随后我又查看了 Microchip PolarFire SoC FPGA 支持的操作系统。
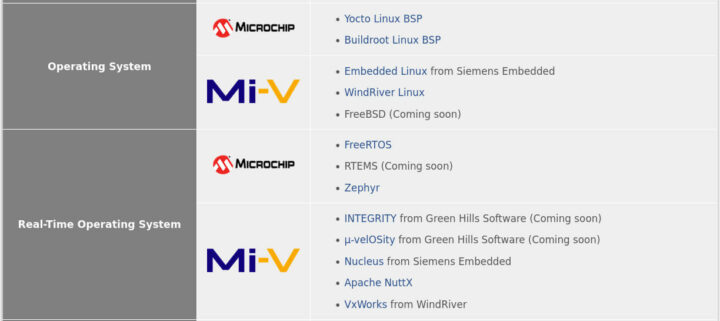
查看之后,我了解到Microchip 支持 Yocto Linux BSP 和 Buidlroot Linux BSP,以及 Siemens Embedded 和 WindRiver 等第三方嵌入式的 Linux 发行版。据说 FreeBSD 即将推出,并且可能会有几个实时操作系统用于 SoC 的小型 64 位 RISC-V 内核。
这意味着除了我计划使用的一些工具之外,没有包管理器和基于 Debian 的根文件系统了。因此,虽然从理论上讲,仍有可能实现我打算做的事情,但我实在没有那么多时间来实现这一目标了,所以我缩小了我的评测范围。我根据从镜像构建 Yocto 镜像的经验,交叉编译了 hello world,同时进行本地编译和运行 EEMBC 基准测试。这其实不是我第一次上手Yocto 项目了,但我仍然学到了一些东西,希望你们也能从中有所收获。
网络服务器演示和电压/电流分析
在开发 Yocto BSP 之前,根据 Microchip 的入门指南我将开发板连接到了以太网,并运行网络服务器。
|
1 2 |
$ cd /opt/microchip/iiohttpserver $ ./run |
运行后,我们可以访问一个网页,该网页将显示 VDDA(XCVR Tx/Rx 通道电源)、VDD25(PLL 和 PNVM 电源)、VDDA25(XCVR PLL 电源)和 VDD(内核电源)的电压和电流,方法是访问 http:/ /<board_ip_address>。
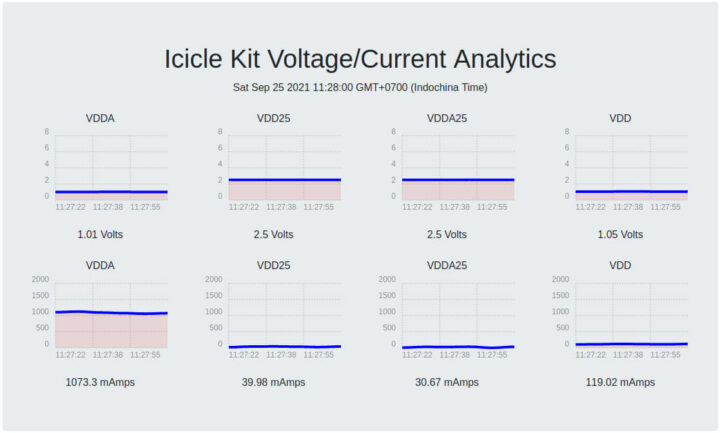
我想一旦我们运行了 EEMBC CoreMark 基准测试,重新访问此页面应该会很有趣。
Yocto Linux BSP
接着我们按照Github上的说明使用 Yocto BSP 构建 Linux 。作为参考,我使用的是运行 Ubuntu 20.04 的笔记本电脑。在此我需要更改一些命令。
首先,我们安装 repo 函数:
|
1 2 3 |
curl -o ${REPO} https://storage.googleapis.com/git-repo-downloads/repo gpg --keyserver hkps://keyserver.ubuntu.com --recv-key 8BB9AD793E8E6153AF0F9A4416530D5E920F5C65 curl -s https://storage.googleapis.com/git-repo-downloads/repo.asc | gpg --verify - ${REPO} && install -m 755 ${REPO} ~/bin/repo |
然后安装一些依赖项:
|
1 |
sudo apt install python3-distutils libyaml-dev libelf-dev chrpath diffstat |
初始化 repo 的时间:
|
1 |
~/bin/repo init -u https://github.com/polarfire-soc/meta-polarfire-soc-yocto-bsp.git -b master -m tools/manifests/riscv-yocto.xml |
现在我们可以修改设置文件:
|
1 2 3 4 5 6 7 8 9 10 11 12 13 14 15 16 17 18 19 20 21 22 23 24 25 26 27 28 29 30 31 32 33 34 35 36 37 38 39 40 41 42 43 44 45 46 47 48 49 50 51 52 53 54 55 56 57 58 59 60 61 62 63 64 65 66 67 68 |
. ./meta-polarfire-soc-yocto-bsp/polarfire-soc_yocto_setup.sh /home/jaufranc/edev/Microchip/yocto-dev expect is already installed at the requested version (5.45.4-2build1) expect is already installed at the requested version (5.45.4-2build1) No packages will be installed, upgraded, or removed. 0 packages upgraded, 0 newly installed, 0 to remove and 9 not upgraded. Need to get 0 B of archives. After unpacking 0 B will be used. spawn sudo dpkg-reconfigure -freadline dash sudo] password for jaufranc: Configuring dash ---------------- The system shell is the default command interpreter for shell scripts. Using dash as the system shell will improve the system's overall performance. It does not alter the shell presented to interactive users. Use dash as the default system shell (/bin/sh)? [yes/no] yes Init OE ### Shell environment set up for builds. ### You can now run 'bitbake <target>' Common targets are: core-image-minimal core-image-full-cmdline core-image-sato core-image-weston meta-toolchain meta-ide-support You can also run generated qemu images with a command like 'runqemu qemux86'. Other commonly useful commands are: - 'devtool' and 'recipetool' handle common recipe tasks - 'bitbake-layers' handles common layer tasks - 'oe-pkgdata-util' handles common target package tasks Adding layers NOTE: Starting bitbake server... NOTE: Starting bitbake server... NOTE: Starting bitbake server... NOTE: Starting bitbake server... NOTE: Starting bitbake server... NOTE: Starting bitbake server... Creating auto.conf To build an image run --------------------------------------------------- MACHINE=icicle-kit-es bitbake mpfs-dev-cli --------------------------------------------------- Buildable machine info --------------------------------------------------- Default MACHINE=icicle-kit-es * icicle-kit-es: Microchip Polarfire SoC Icicle Kit Engineering Sample, emmc/sd boot. * qemuriscv64: The 64-bit RISC-V machine --------------------------------------------------- Bitbake Image --------------------------------------------------- * mpfs-dev-cli: MPFS Linux console-only image with development packages. * core-image-minimal-dev: OE console-only image, with some additional development packages. * core-image-minimal: OE console-only image * core-image-full-cmdline: OE console-only image with more full-featured Linux system functionality installed. * qemuriscv64: The 64-bit RISC-V machine --------------------------------------------------- |
在开始构建前,要运行以下命令:
|
1 |
MACHINE=icicle-kit-es bitbake mpfs-dev-cli |
我记得大约 10 年前,Yocto 构建系统可能需要花大量的时间,在低端笔记本电脑上构建镜像甚至要超过 24 小时。而且在默认设置下,我由 8 核 AMD Ryzen 7 2700U 处理器驱动并配备了 16 GB RAM的笔记本电脑,在 50 多的 CPU 负载下运行都由很快变得极其慢甚至无法使用:
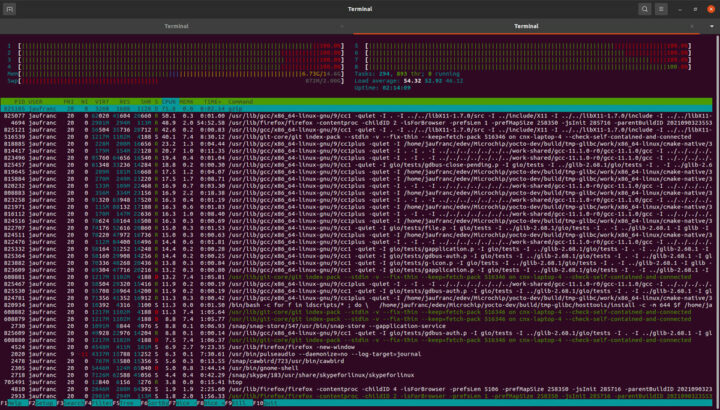
我构建之后就去吃饭然后上床睡觉了。但我没有检查存储需求,大约两个小时后,由于硬盘空间不足,构建就停止了。正如我们看到的,要构建完成,大约需要100 GB的可用存储空间。
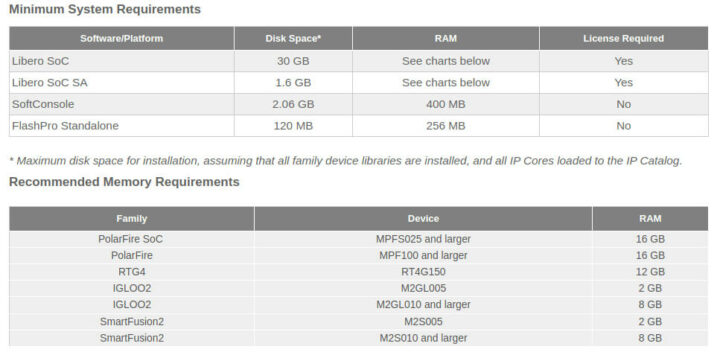
接着我们来讨论系统要求,Libero SoC 设计套件需要大约 35 GB 的额外空间,而 PolarFire SoC 开发至少需要 16 GB RAM。因此,你们需要一个功能强大的工作站来在 PolarFire SoC FPGA Icicle 开发套件上开发应用程序,并具需要有足够的 RAM 和足够的存储空间。
回到我们的 Yocto 构建。理想的情况是拥有一个专用的构建服务器,但如果你打算在构建的同时使用计算机,你可能就需要编辑 [your_yocto_build_dir]/conf/local.conf
|
1 2 |
BB_NUMBER_THREADS = "4" PARALLEL_MAKE = "-j 4" |
然后,按照如下操作
|
1 |
source setup-environment ./your_build_folder |
另一种方法是使用 Ctrl-Z 暂停构建,其工作方式与 Ctrl-C 类似,但使用SIGTSTP而不是 SIGINT 来暂停进程,记住是暂停而不是终止它。
|
1 2 3 4 5 6 7 8 9 10 11 12 13 14 15 16 17 18 19 20 21 22 23 24 25 26 27 28 29 30 31 32 33 34 35 36 37 38 39 40 41 42 43 44 45 46 47 |
time MACHINE=icicle-kit-es bitbake mpfs-dev-cli Loading cache: 100% | | ETA: --:--:-- Loaded 0 entries from dependency cache. Parsing recipes: 100% |##########################################| Time: 0:01:43 Parsing of 2381 .bb files complete (0 cached, 2381 parsed). 3667 targets, 166 skipped, 0 masked, 0 errors. NOTE: Resolving any missing task queue dependencies Build Configuration: BB_VERSION = "1.51.0" BUILD_SYS = "x86_64-linux" NATIVELSBSTRING = "ubuntu-20.04" TARGET_SYS = "riscv64-oe-linux" MACHINE = "icicle-kit-es" DISTRO = "nodistro" DISTRO_VERSION = "nodistro.0" TUNE_FEATURES = "riscv64" meta = "HEAD:14795ee305f3c11fcc31cc7ca815b8ff1020e29a" meta-oe meta-python meta-multimedia meta-networking = "HEAD:dcb9ecc1e5720c9614b1cd27575e1e4886dff5c1" meta-riscv = "HEAD:35d1d5849294ff9f2fb98b90657bbf7a1e532d0d" meta-polarfire-soc-yocto-bsp = "HEAD:3c53ffcae8ac86686a53cd15b4541fc7eca1e36f" NOTE: Fetching uninative binary shim http://downloads.yoctoproject.org/releases/uninative/3.1/x86_64-nativesdk-libc.tar.xz;sha256sum=5d0611df544edff6428cef7d871257a91aa6ba1bd92f5365a2df8deb54b6b31e (will check PREMIRRORS first) Initialising tasks: 100% |#######################################| Time: 0:00:11 Sstate summary: Wanted 2529 Local 0 Network 0 Missed 2529 Current 0 (0% match, 0% complete) NOTE: Executing Tasks WARNING: expat-native-2.3.0-r0 do_fetch: Failed to fetch URL https://downloads.sourceforge.net/expat/expat-2.3.0.tar.bz2, attempting MIRRORS if available WARNING: libtalloc-2.3.2-r0 do_fetch: Failed to fetch URL https://www.samba.org/ftp/talloc/talloc-2.3.2.tar.gz, attempting MIRRORS if available WARNING: boost-1.76.0-r0 do_fetch: Failed to fetch URL https://dl.bintray.com/boostorg/release/1.76.0/source/boost_1_76_0.tar.bz2, attempting MIRRORS if available WARNING: htop-3.0.5-r0 do_fetch: Failed to fetch URL git://github.com/htop-dev/htop.git, attempting MIRRORS if available Currently 8 running tasks (5382 of 7084) 75% |####################### | Currently 6 running tasks (6040 of 7084) 85% |########################## | 0: cmake-3.20.1-r0 do_compile (pid 3565535) 72% |#################### | 1: boost-1.76.0-r0 do_compile - 24m44s (pid 3578779) 2: kernel-devsrc-1.0-r0 do_install - 15m17s (pid 3619862) 3: gcc-11.1.0-r0 do_package_write_ipk - 1m23s (pid 3665048) 4: libcheck-0.15.2-r0 do_package_write_ipk - 32s (pid 3669480) 5: libsamplerate0-0.1.9-r1 do_package_write_ipk - 24s (pid 3669801) [1]+ Stopped MACHINE=icicle-kit-es bitbake mpfs-dev-cli real 328m42.945s user 0m0.000s sys 0m0.004s jaufranc@cnx-laptop-4:~/edev/Microchip/yocto-dev/build$ |
由于 bitbake 产生了许多其他进程,我们必须等待它们完成,大约需要 10 分钟才能恢复使用普通计算机。
我将构建进程暂停了大约 3 个小时,然后可以使用命令“fg”恢复它。这就像终端程序的休眠模式,它一直存在。然而要么是我忘记了它,要么自己从未使用过。,所以几经折腾之后,在我的机器上完成构建大约花了 7 到 8 小时。
这是 Yocto BSP 使用的空间:
|
1 2 3 4 5 6 7 8 |
~/edev/Microchip/yocto-dev$ du --max-depth=1 -h 313M ./.repo 36M ./meta-openembedded 376K ./meta-polarfire-soc-yocto-bsp 6.3M ./meta-riscv 94G ./build 45M ./openembedded-core 94G . |
我们可以在tmp-glibc/deploy/images/icicle-kit-es/文件夹中找到镜像:
|
1 2 3 4 5 6 7 8 9 10 11 12 13 14 15 16 17 18 19 20 21 22 23 24 25 26 27 28 29 30 31 32 33 34 35 36 |
ls -lh tmp-glibc/deploy/images/icicle-kit-es/ total 9.8G -rwxr-xr-x 1 jaufranc jaufranc 1.3K Sep 26 18:06 boot.scr.uimg lrwxrwxrwx 2 jaufranc jaufranc 68 Sep 26 18:07 fitImage -> fitImage--5.12.1+git0+ce6fc289da-r0-icicle-kit-es-20210926061423.bin -rw-r--r-- 2 jaufranc jaufranc 4.6M Sep 26 18:07 fitImage--5.12.1+git0+ce6fc289da-r0-icicle-kit-es-20210926061423.bin lrwxrwxrwx 2 jaufranc jaufranc 68 Sep 26 18:07 fitImage-icicle-kit-es.bin -> fitImage--5.12.1+git0+ce6fc289da-r0-icicle-kit-es-20210926061423.bin -rw-r--r-- 2 jaufranc jaufranc 1.7K Sep 26 18:08 fitImage-its--5.12.1+git0+ce6fc289da-r0-icicle-kit-es-20210926061423.its lrwxrwxrwx 2 jaufranc jaufranc 72 Sep 26 18:08 fitImage-its-icicle-kit-es -> fitImage-its--5.12.1+git0+ce6fc289da-r0-icicle-kit-es-20210926061423.its -rw-r--r-- 2 jaufranc jaufranc 4.6M Sep 26 18:08 fitImage-linux.bin--5.12.1+git0+ce6fc289da-r0-icicle-kit-es-20210926061423.bin lrwxrwxrwx 2 jaufranc jaufranc 78 Sep 26 18:08 fitImage-linux.bin-icicle-kit-es -> fitImage-linux.bin--5.12.1+git0+ce6fc289da-r0-icicle-kit-es-20210926061423.bin -rw-r--r-- 2 jaufranc jaufranc 11K Sep 26 18:08 microchip-mpfs-icicle-kit--5.12.1+git0+ce6fc289da-r0-icicle-kit-es-20210926061423.dtb lrwxrwxrwx 2 jaufranc jaufranc 85 Sep 26 18:08 microchip-mpfs-icicle-kit.dtb -> microchip-mpfs-icicle-kit--5.12.1+git0+ce6fc289da-r0-icicle-kit-es-20210926061423.dtb lrwxrwxrwx 2 jaufranc jaufranc 85 Sep 26 18:08 microchip-mpfs-icicle-kit-icicle-kit-es.dtb -> microchip-mpfs-icicle-kit--5.12.1+git0+ce6fc289da-r0-icicle-kit-es-20210926061423.dtb lrwxrwxrwx 2 jaufranc jaufranc 38 Sep 26 18:06 mmc-tftp-icicle-kit-es.txt -> mmc-tftp-icicle-kit-es-v2021.04-r0.txt -rw-r--r-- 2 jaufranc jaufranc 1.2K Sep 26 18:06 mmc-tftp-icicle-kit-es-v2021.04-r0.txt lrwxrwxrwx 2 jaufranc jaufranc 38 Sep 26 18:06 mmc-tftp.txt -> mmc-tftp-icicle-kit-es-v2021.04-r0.txt -rw-r--r-- 2 jaufranc jaufranc 1.6M Sep 26 18:08 modules--5.12.1+git0+ce6fc289da-r0-icicle-kit-es-20210926061423.tgz lrwxrwxrwx 2 jaufranc jaufranc 67 Sep 26 18:08 modules-icicle-kit-es.tgz -> modules--5.12.1+git0+ce6fc289da-r0-icicle-kit-es-20210926061423.tgz -rw-r--r-- 2 jaufranc jaufranc 5.1K Sep 27 09:29 mpfs-dev-cli.env -rw-r--r-- 2 jaufranc jaufranc 5.4G Sep 27 09:46 mpfs-dev-cli-icicle-kit-es-20210927021251.rootfs.ext4 -rw-r--r-- 2 jaufranc jaufranc 103K Sep 27 09:27 mpfs-dev-cli-icicle-kit-es-20210927021251.rootfs.manifest -rw-r--r-- 2 jaufranc jaufranc 5.5G Sep 27 09:50 mpfs-dev-cli-icicle-kit-es-20210927021251.rootfs.wic -rw-r--r-- 2 jaufranc jaufranc 1.4G Sep 27 09:58 mpfs-dev-cli-icicle-kit-es-20210927021251.rootfs.wic.gz -rw-r--r-- 2 jaufranc jaufranc 225K Sep 27 09:27 mpfs-dev-cli-icicle-kit-es-20210927021251.testdata.json lrwxrwxrwx 2 jaufranc jaufranc 53 Sep 27 09:46 mpfs-dev-cli-icicle-kit-es.ext4 -> mpfs-dev-cli-icicle-kit-es-20210927021251.rootfs.ext4 lrwxrwxrwx 2 jaufranc jaufranc 57 Sep 27 09:27 mpfs-dev-cli-icicle-kit-es.manifest -> mpfs-dev-cli-icicle-kit-es-20210927021251.rootfs.manifest lrwxrwxrwx 2 jaufranc jaufranc 55 Sep 27 09:27 mpfs-dev-cli-icicle-kit-es.testdata.json -> mpfs-dev-cli-icicle-kit-es-20210927021251.testdata.json lrwxrwxrwx 2 jaufranc jaufranc 52 Sep 27 09:58 mpfs-dev-cli-icicle-kit-es.wic -> mpfs-dev-cli-icicle-kit-es-20210927021251.rootfs.wic lrwxrwxrwx 2 jaufranc jaufranc 55 Sep 27 09:58 mpfs-dev-cli-icicle-kit-es.wic.gz -> mpfs-dev-cli-icicle-kit-es-20210927021251.rootfs.wic.gz -rwxr-xr-x 1 jaufranc jaufranc 477K Sep 26 22:30 payload.bin lrwxrwxrwx 2 jaufranc jaufranc 36 Sep 26 18:06 u-boot.bin -> u-boot-icicle-kit-es-v2021.04-r0.bin lrwxrwxrwx 2 jaufranc jaufranc 36 Sep 26 18:06 u-boot-icicle-kit-es.bin -> u-boot-icicle-kit-es-v2021.04-r0.bin -rw-r--r-- 2 jaufranc jaufranc 476K Sep 26 18:06 u-boot-icicle-kit-es-v2021.04-r0.bin lrwxrwxrwx 2 jaufranc jaufranc 49 Sep 26 18:06 u-boot-mpfs-initial-env -> u-boot-mpfs-initial-env-icicle-kit-es-v2021.04-r0 lrwxrwxrwx 2 jaufranc jaufranc 49 Sep 26 18:06 u-boot-mpfs-initial-env-icicle-kit-es -> u-boot-mpfs-initial-env-icicle-kit-es-v2021.04-r0 -rw-r--r-- 2 jaufranc jaufranc 3.2K Sep 26 18:06 u-boot-mpfs-initial-env-icicle-kit-es-v2021.04-r0 |
未压缩的镜像有 5.5GB,因此 8GB SD 卡是够使用的。但我建议使用 16GB 或 32GB 卡。下面是 Microchip 提供的将其闪存到 SD 卡的命令:
|
1 |
zcat tmp-glibc/deploy/images/icicle-kit-es/mpfs-dev-cli-icicle-kit-es.wic.gz | sudo dd of=/dev/sdX bs=4096 iflag=fullblock oflag=direct conv=fsync status=progress |
如果你想要验证镜像,像USBImager这样的实用程序将是首选。这就是我用来将镜像烧写到 32GB SD 卡的方法,然后我将其插入开发板的 SD 卡插槽中进行试用。
我们中断启动来检查一下是否能检测到 SD 卡:
|
1 2 3 4 5 6 7 8 9 10 11 12 13 14 15 16 17 18 19 20 21 22 23 24 |
U-Boot 2021.04 (Sep 26 2021 - 09:16:21 +0000) CPU: rv64imafdc Model: Microchip MPFS Icicle Kit DRAM: 2 GiB MMC: mmc@20008000: 0 In: serial@20100000 Out: serial@20100000 Err: serial@20100000 Net: eth0: ethernet@20112000 Hit any key to stop autoboot: 0 RISC-V # mmcinfo Device: mmc@20008000 Manufacturer ID: 0 OEM: 3432 Name: SD16G Bus Speed: 50000000 Mode: SD High Speed (50MHz) Rd Block Len: 512 SD version 3.0 High Capacity: Yes Capacity: 29.1 GiB Bus Width: 4-bit Erase Group Size: 512 Bytes |
一切正常了,我们继续,但它无法切换到内核。最终我使用了未压缩的二进制文件重新刷新镜像,然后我就可以登录到终端:
|
1 2 3 4 5 6 7 8 9 10 11 12 13 14 15 16 17 18 19 20 21 22 23 24 25 26 27 28 29 30 31 32 |
root@icicle-kit-es:~# uname -a Linux icicle-kit-es 5.12.1 #1 SMP Sun Sep 26 08:45:19 UTC 2021 riscv64 riscv64 riscv64 GNU/Linux root@icicle-kit-es:~# df -g df: invalid option -- 'g' Try 'df --help' for more information. root@icicle-kit-es:~# df -f df: invalid option -- 'f' Try 'df --help' for more information. root@icicle-kit-es:~# df -h Filesystem Size Used Avail Use% Mounted on /dev/root 5.2G 4.2G 733M 86% / devtmpfs 817M 0 817M 0% /dev tmpfs 818M 0 818M 0% /dev/shm tmpfs 327M 9.5M 318M 3% /run tmpfs 4.0M 0 4.0M 0% /sys/fs/cgroup tmpfs 818M 0 818M 0% /tmp tmpfs 818M 100K 818M 1% /var/volatile tmpfs 164M 0 164M 0% /run/user/0 root@icicle-kit-es:~# fdisk -l GPT PMBR size mismatch (11334293 != 61067263) will be corrected by write. The backup GPT table is not on the end of the device. Disk /dev/mmcblk0: 29.12 GiB, 31266439168 bytes, 61067264 sectors Units: sectors of 1 * 512 = 512 bytes Sector size (logical/physical): 512 bytes / 512 bytes I/O size (minimum/optimal): 512 bytes / 512 bytes Disklabel type: gpt Disk identifier: 707A61C6-0BE8-405E-BF47-9E8071F3EEC9 Device Start End Sectors Size Type /dev/mmcblk0p1 8192 47009 38818 19M Microsoft basic data /dev/mmcblk0p2 47010 63393 16384 8M BIOS boot /dev/mmcblk0p3 65536 11334259 11268724 5.4G Linux filesystem |
rootfs 没有自动调整大小,似乎是因为 GPT 表有问题。我不太确定这一步发生了什么。但是由于我们的自建镜像正在运行,而且我们有一个 eMMC 闪存,我就闪存到了内部存储。
将板子断电,取出SD卡,用Bootterm连接ttyUSB0,访问HSS终端:
|
1 |
bt ttyUSB0 |
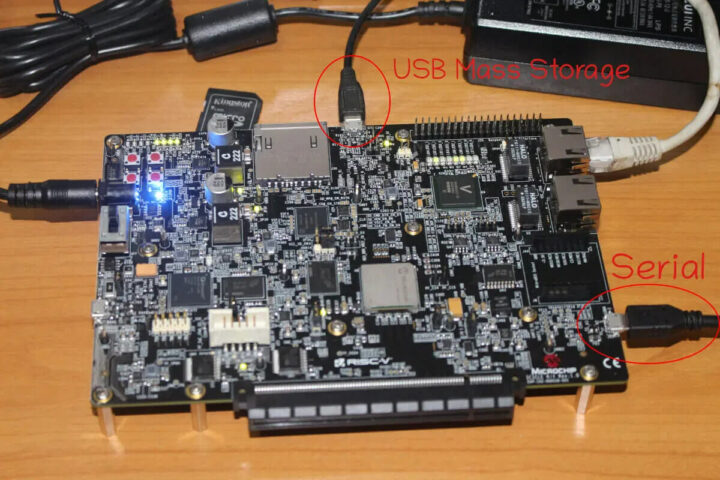
在重新启动开发板之前,中断启动,然后输入“usbdmsc”将 eMMC 闪存作为 USB 大容量存储开放给我们的 Ubuntu 笔记本电脑。
|
1 2 3 4 5 6 7 8 9 10 11 12 13 14 15 16 |
[5.623947] HSS_MMCInit(): Attempting to select eMMC ... Passed Press a key to enter CLI, ESC to skip Timeout in 5 seconds .[6.915522] HSS_ShowTimeout(): Character 32 pressed [6.921945] HSS_TinyCLI_Parser(): Type HELP for list of commands [6.929236] HSS_TinyCLI_Parser(): >> usbdmsc [27.703151] HSS_TinyCLI_Execute(): Unknown command >><<. [27.710094] HSS_TinyCLI_Parser(): >> usbdmsc [37.207116] HSS_MMCInit(): Attempting to select SDCARD ... [38.215220] mmc_init_common(): MSS_MMC_init() returned unexpected 0 Failed [38.223900] HSS_MMCInit(): Attempting to select eMMC ... Passed Waiting for USB Host to connect... (CTRL-C to quit) USB Host connected. Waiting for disconnect... (CTRL-C to quit) 664064 bytes written, 21166080 bytes read |
注意,在这里我们需要另一根连接到 J16 Micro USB 端口的 Micro USB 电缆才能在 Ubuntu 中查看烧录过程。
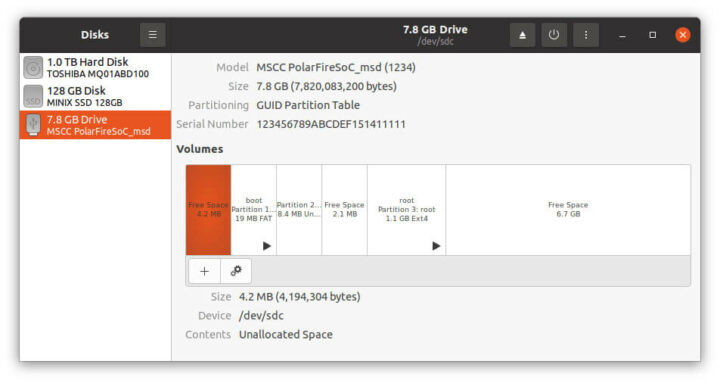
我们可以像对 SD 卡那样在烧录镜像之前卸载 Boot 和 root 分区。我先尝试使用 gz 镜像,但我遇到了与 SD 卡相同的问题,即使在 PC 上也无法安装root分区,因此我就使用未压缩的镜像了,之后一切顺利。

完成后,我们就可以拔掉连接到 J16 的 micro USB 电缆,并访问我们的 Linux 镜像。
|
1 2 3 4 5 6 7 8 9 10 11 12 13 14 15 16 17 18 |
jaufranc@cnx-laptop-4:~/edev/Microchip/yocto-dev/build$ bt ttyUSB1 Trying port ttyUSB1... Connected to ttyUSB1 at 115200 bps. Escape character is 'Ctrl-]'. Use escape followed by '?' for help. icicle-kit-es login: root root@icicle-kit-es:~# uname -a Linux icicle-kit-es 5.12.1 #1 SMP Sun Sep 26 08:45:19 UTC 2021 riscv64 riscv64 riscv64 GNU/Linux root@icicle-kit-es:~# df -h Filesystem Size Used Avail Use% Mounted on /dev/root 5.2G 4.2G 733M 86% / devtmpfs 817M 0 817M 0% /dev tmpfs 818M 0 818M 0% /dev/shm tmpfs 327M 9.6M 318M 3% /run tmpfs 4.0M 0 4.0M 0% /sys/fs/cgroup tmpfs 818M 0 818M 0% /tmp tmpfs 818M 100K 818M 1% /var/volatile tmpfs 164M 0 164M 0% /run/user/0 root@icicle-kit-es:~# |
小标题:Hello World 交叉编译
接下来,我们尝试交叉编译的 Hello World 程序。
|
1 2 3 4 5 |
#include <stdio.h> int main() { printf("Hello, World!\n"); return 0; } |
对于使用 Yocto 工具链的 RISC-V,我们要首先将其添加到我们的路径中:
|
1 |
export PATH=$PATH:~/edev/Microchip/yocto-dev/build/tmp-glibc/sysroots-components/x86_64/gcc-cross-riscv64/usr/bin/riscv64-oe-linux |
并使用 RISCV GCC 工具来构建它:
|
1 2 3 4 5 |
riscv64-oe-linux-gcc hello.c -o hello hello.c:1:10: fatal error: stdio.h: No such file or directory 1 | #include <stdio.h> | ^~~~~~~~~ compilation terminated. |
糟糕,它并没有按预期工作。看起来是因为工具链没有正确安装,或者是因为我使用了错误的工具链。我尝试过使用 CFLAGS,但还是没有成功。也许它只能在 Yocto/Bitbake 框架中工作。根据我以往对 buildroot 的经验,交叉编译工具链是可以开箱即用的。
EEMBC CoreMark 基准
所以我将在本地构建 EEMBC CoreMark,即直接在板上构建。我们构建的镜像带有 git 和 GNU GCC 工具链,所以它应该很简单。
|
1 2 3 |
https://github.com/eembc/coremark cd coremark/ make -j4 |
这一操作可以构建和运行 CoreMark 并生成两个文件
- run1.log
|
1 2 3 4 5 6 7 8 9 10 11 12 13 14 15 16 17 |
2K performance run parameters for coremark. CoreMark Size : 666 Total ticks : 14935 Total time (secs): 14.935000 Iterations/Sec : 1339.136257 Iterations : 20000 Compiler version : GCC11.1.0 Compiler flags : -O2 -DPERFORMANCE_RUN=1 -lrt Memory location : Please put data memory location here (e.g. code in flash, data on heap etc) seedcrc : 0xe9f5 [0]crclist : 0xe714 [0]crcmatrix : 0x1fd7 [0]crcstate : 0x8e3a [0]crcfinal : 0x382f Correct operation validated. See README.md for run and reporting rules. CoreMark 1.0 : 1339.136257 / GCC11.1.0 -O2 -DPERFORMANCE_RUN=1 -lrt / Heap |
- run2.log
|
1 2 3 4 5 6 7 8 9 10 11 12 13 14 15 16 |
2K validation run parameters for coremark. CoreMark Size : 666 Total ticks : 14907 Total time (secs): 14.907000 Iterations/Sec : 1341.651573 Iterations : 20000 Compiler version : GCC11.1.0 Compiler flags : -O2 -DPERFORMANCE_RUN=1 -lrt Memory location : Please put data memory location here (e.g. code in flash, data on heap etc) seedcrc : 0x18f2 [0]crclist : 0xe3c1 [0]crcmatrix : 0x0747 [0]crcstate : 0x8d84 [0]crcfinal : 0xd304 Correct operation validated. See README.md for run and reporting rules. |
由于 RISC-V 内核以 600 MHz 运行,该板获得了 1339.136257 的分数,大约 2.23 CoreMark/MHz。但是Microchip 报告板上显示有3.25 CoreMark/MHz。让我们与Microchip公司使用相同的配置再试一次:
|
1 2 |
make clean make XCFLAGS="-O3 -DHAS_STDIO -DHAS_TIME_H -DUSE_CLOCK -fno-common -funroll-loops -finline-functions -falign-functions=16 -falign-jumps=4 -falign-loops=4 -finline-limit=1000 -fno-if-conversion2 -fselective-scheduling -fno-tree-dominator-opts -lpthread -DHAS_FLOAT=0 -mtune=sifive-7-series" |
这是 run1.log 的内容:
|
1 2 3 4 5 6 7 8 9 10 11 12 13 14 15 16 |
2K performance run parameters for coremark. CoreMark Size : 666 Total ticks : 12874295 Total time (secs): 12 Iterations/Sec : 1666 Iterations : 20000 Compiler version : GCC11.1.0 Compiler flags : -O2 -O3 -DHAS_STDIO -DHAS_TIME_H -DUSE_CLOCK -fno-common -funroll-loops -finline-functions -falign-functions=16 -falign-jumps=4 -falign-loops=4 -finline-limit=1000 -fno-if-conversion2 -fselective-scheduling -fno-tree-dominator-opts -lpthread -DHAS_FLOAT=0 -mtune=sifive-7-series -DPERFORMANCE_RUN=1 -lrt Memory location : Please put data memory location here (e.g. code in flash, data on heap etc) seedcrc : 0xe9f5 [0]crclist : 0xe714 [0]crcmatrix : 0x1fd7 [0]crcstate : 0x8e3a [0]crcfinal : 0x382f Correct operation validated. See README.md for run and reporting rules. |
不知何故,CoreMark 的分数找不到了,但我们仍然可以看到其迭代次数/秒从 1341.651573 达到了 1666。由此看来新配置确实有所提高了。很容易看出为什么分数没有显示了,我们也可以看看代码:
|
1 2 3 4 5 6 7 8 9 10 11 |
ee_printf( "Correct operation validated. See README.md for run and reporting " "rules.\n"); #if HAS_FLOAT if (known_id == 3) { ee_printf("CoreMark 1.0 : %f / %s %s", default_num_contexts * results[0].iterations / time_in_secs(total_time), COMPILER_VERSION, COMPILER_FLAGS); |
我们用 -DHAS_FLOAT=1 重复这个过程。
|
1 |
make clean make XCFLAGS="-O3 -DHAS_STDIO -DHAS_TIME_H -DUSE_CLOCK -fno-common -funroll-loops -finline-functions -falign-functions=16 -falign-jumps=4 -falign-loops=4 -finline-limit=1000 -fno-if-conversion2 -fselective-scheduling -fno-tree-dominator-opts -lpthread -DHAS_FLOAT=1 -mtune=sifive-7-series" |
这次看起来是正确的:
|
1 2 3 4 5 6 7 8 9 10 11 12 13 14 15 16 17 |
2K performance run parameters for coremark. CoreMark Size : 666 Total ticks : 12842191 Total time (secs): 12.842191 Iterations/Sec : 1557.366652 Iterations : 20000 Compiler version : GCC11.1.0 Compiler flags : -O2 -O3 -DHAS_STDIO -DHAS_TIME_H -DUSE_CLOCK -fno-common -funroll-loops -finline-functions -falign-functions=16 -falign-jumps=4 -falign-loops=4 -finline-limit=1000 -fno-if-conversion2 -fselective-scheduling -fno-tree-dominator-opts -lpthread -DHAS_FLOAT=1 -mtune=sifive-7-series -DPERFORMANCE_RUN=1 -lrt Memory location : Please put data memory location here (e.g. code in flash, data on heap etc) seedcrc : 0xe9f5 [0]crclist : 0xe714 [0]crcmatrix : 0x1fd7 [0]crcstate : 0x8e3a [0]crcfinal : 0x382f Correct operation validated. See README.md for run and reporting rules. CoreMark 1.0 : 1557.366652 / GCC11.1.0 -O2 -O3 -DHAS_STDIO -DHAS_TIME_H -DUSE_CLOCK -fno-common -funroll-loops -finline-functions -falign-functions=16 -falign-jumps=4 -falign-loops=4 -finline-limit=1000 -fno-if-conversion2 -fselective-scheduling -fno-tree-dominator-opts -lpthread -DHAS_FLOAT=1 -mtune=sifive-7-series -DPERFORMANCE_RUN=1 -lrt / Heap |
但这只有 2.59 CoreMark/Mhz,还没有达到 3.125 CoreMark/MHz。实际上,它是使用无符号索引的,而且符合Microchip的结果。有人也尝试做了同样的事情,并被很多人建议更改posix/core_portme.h 中的代码以使用签名索引:
|
1 |
typedef signed int ee_u32; |
再次运行基准测试后,得分更高:
|
1 2 3 4 5 6 7 8 9 10 11 12 13 14 15 16 17 |
2K performance run parameters for coremark. CoreMark Size : 666 Total ticks : 16767651 Total time (secs): 16.767651 Iterations/Sec : 1789.159376 Iterations : 30000 Compiler version : GCC11.1.0 Compiler flags : -O2 -O3 -DHAS_STDIO -DHAS_TIME_H -DUSE_CLOCK -fno-common -funroll-loops -finline-functions -falign-functions=16 -falign-jumps=4 -falign-loops=4 -finline-limit=1000 -fno-if-conversion2 -fselective-scheduling -fno-tree-dominator-opts -lpthread -DHAS_FLOAT=1 -mtune=sifive-7-series -DPERFORMANCE_RUN=1 -lrt Memory location : Please put data memory location here (e.g. code in flash, data on heap etc) seedcrc : 0xe9f5 [0]crclist : 0xe714 [0]crcmatrix : 0x1fd7 [0]crcstate : 0x8e3a [0]crcfinal : 0x5275 Correct operation validated. See README.md for run and reporting rules. CoreMark 1.0 : 1789.159376 / GCC11.1.0 -O2 -O3 -DHAS_STDIO -DHAS_TIME_H -DUSE_CLOCK -fno-common -funroll-loops -finline-functions -falign-functions=16 -falign-jumps=4 -falign-loops=4 -finline-limit=1000 -fno-if-conversion2 -fselective-scheduling -fno-tree-dominator-opts -lpthread -DHAS_FLOAT=1 -mtune=sifive-7-series -DPERFORMANCE_RUN=1 -lrt / Heap |
1789.159376 CoreMark 对应的大约是 2.98 CoreMark/MHz。接下来通过在 make 命令行中定义 HAS_FLOAT=0 来做最后的破解。结果:
|
1 2 3 4 5 6 7 8 9 10 11 12 13 14 15 16 |
2K performance run parameters for coremark. CoreMark Size : 666 Total ticks : 16694339 Total time (secs): 16 Iterations/Sec : 1875 Iterations : 30000 Compiler version : GCC11.1.0 Compiler flags : -O2 -O3 -DHAS_STDIO -DHAS_TIME_H -DUSE_CLOCK -fno-common -funroll-loops -finline-functions -falign-functions=16 -falign-jumps=4 -falign-loops=4 -finline-limit=1000 -fno-if-conversion2 -fselective-scheduling -fno-tree-dominator-opts -lpthread -DHAS_FLOAT=0 -mtune=sifive-7-series -DPERFORMANCE_RUN=1 -lrt Memory location : Please put data memory location here (e.g. code in flash, data on heap etc) seedcrc : 0xe9f5 [0]crclist : 0xe714 [0]crcmatrix : 0x1fd7 [0]crcstate : 0x8e3a [0]crcfinal : 0x5275 Correct operation validated. See README.md for run and reporting rules. |
看看我们使用 Iterations/Sec 的结果:1875 作为 CoreMark 1.0 的数值。在这种情况下,我们确实可以达到 3.125 CoreMark/MHz,就像 Microchip 使用带符号索引所做的那样。但是为什么有符号比无符号快得多,我不太确定。我们需要查看一下程序集,并检查每条指令的周期数才能找出答案。
这次测试过程真实地展示了如何调整/操纵基准以获得更好的结果,以及编译标志对优化代码的重要性。电压/电流分析网页在测试期间没有显示任何显著变化。
这就是本文评测的全部内容,之后,我可能会发布一些 FPGA 部分的内容。有人让我通过 PCI-e 总线评估 virt-io,但由于时间限制,我就没有这样做。因为有人说Microchip应该可以工作,我还咨询了他们,但他们到目前为止并没有测试过。
如果你们对该板感兴趣,可以从各种分销商处购买,价格应该不到 500 美元。

文章翻译者:Nicholas,技术支持工程师、瑞科慧联(RAK)高级工程师,深耕嵌入式开发技术、物联网行业多年,拥有丰富的行业经验和新颖独到的眼光!
